
A Crash Course on Music Theory
Wednesday, November 15th, 2023
Recently, I made a comment on a Reddit thread which got a lot of positive feedback. I decided to take the contents of that comment and turn it into a post here on my blog, so that it could be used as supporting material for a video demonstration of some of these concepts.
The reddit post in question was titled: "My guitar teacher tells me i have to know this and i just have no idea what this is".
It included this somewhat mysterious image:
There's definitely at least some minor malpractice on the part of the instructor going on here. The diagram is extremely sloppy, and uses some notation which seems to have not made any sense to the student. But in spite of those issues, this diagram is actually showing a very useful concept for guitarists, so I took it upon myself to try to explain it in my comments on the thread.
Before I get into the explanation, here's two alternate diagrams I made, which are easier to read:


Here's the comment I wrote. I took some extra time to generate nice diagrams, however. Wherever it made sense to do so, I replaced diagrams that were originally done in markdown code blocks in the original post. I've also changed some wording here and there. Apart from those changes, the content here is essentially the same as what I wrote in my original reddit post.
Believe it or not, this is an extremely useful diagram, but it's very information dense and relies on a lot of concepts that a newer student may or may not have been exposed too. There a few weird bits of notation that don't make sense to me though. It's also sloppy af but that's a different issue.
But there's some serious background knowledge required to understand everything that's going on here. I'll try to give a crash course.
Ok, so background knowledge first. Let's talk a bit about the major scale and how we can use it to "build" chords, which give us the chords that are "valid" (or "diatonic") in any given key.
Building the Major Scale
We can build a major scale with the following formula of whole and half steps. (Just in case you don't know this, a whole step is two semitones, or two frets on the guitar, and a half step is one semitone, or one fret).
To use the formula, you start with a root note, and then get each following note by going up by either a whole or half step.
Major scale formula in steps: W W H W W W H
If we start on the root note of A, the we get the following notes in the A major scale. The W/H under each note indicates the "distance" from the preceding note. B is a whole step from A, D is a half step from C#, and so forth.
A B C# D E F# G# A
  W W  H W W  W H
Here's what that scale looks like tabbed out on the E string, which should help make the "whole step / half step" thing more clear.

E ---5---7---9---10---12---14---16---17----------------
     A   B   C#  D    E    F#   G#   A
Building the Minor Scale
We can do the same kind of thing to build a minor scale. The only difference is the formula. There are some interesting facts about the relationship between the major and minor scale and how this all ties into the concept of modes, but that's not important for this discussion, so let's not get distracted.
Minor scale formula in steps: W H W W H W W
If we start on the root note of A, the we get the following notes in the A minor scale. The W/H under each note indicates the "distance" from the preceding note.
A B C D E F G A
  W H W W H W W
Here's what that scale looks like tabbed out on the E string.

E ---5---7---8---10---12---13---15---17----------------
     A   B   C   D    E    F    G    A
Building Chords from a Scale
Ok, so now that you understand the basic idea of how we can figure out the notes in a scale from a starting note, we can talk about building the diatonic chords of a key. (i.e. the chords that are "valid" in that key, which contain only notes from that "parent" scale).
Chords are built by "stacking thirds," and this terminology can be a bit confusing. It's described that way because any given chord (besides other chord types which are outside the scope of this discussion) are composed by taking a note and adding on notes which are either a major third (4 half steps) or a minor third (3 half steps) away from that note. But that's confusing, and depends on having some intuition for intervals, so don't worry about it too much for now. The easy way to think about it is - pick a note in the scale as a root, then skip a note to get the next note in the chord, then skip another to get the next note.
This whole idea of skipping notes is a little bit of a shortcut - it's better to eventually understand chords in terms of intervals. But we'll address that in another post - this is good enough to get us moving.
So let's try this out with our A major scale. We'll start with the root note, A, and "skip notes" or "stack thirds" to get a chord.
Here's our A major scale again:
A B C# D E F# G#
^ start on the A

A B C# D E F# G#
    ^
    skip a note to get C#

A B C# D E F# G#
         ^
         skip a note to get E

This gives us the notes A, C#, E - which are the notes that form the chord A major.
We can play the same game starting on any note in the scale. Let's try starting out on C#:
A B C# D E F# G#
    ^
    start on C#

A B C# D E F# G#
        ^
        skip a note to get E

A B C# D E F# G#
            ^ skip again to get G#

This gives us the notes C#, E, G# - which form the chord C minor.
If we go through this exercise for each note in the scale, we'll get the following series of chords:
A major:  A C# E
B minor:  B D F#
C# minor: C# E G#
D major:  D F# A
E major:  E G# B
F# minor: F# A C#
G# diminished: G# B D
We can do the exact same exercise to get the chords for a minor scale. Lay out the scale, skip notes, and build chords. Here's the chords for the key of A minor:
A minor: A C E
B dim  : B D F
C major: C E G
D minor: D F A
E minor: E G B
F major: F A C
G major: G B D
Now, after understanding the idea of building a major or minor scale, and understanding how we can build the corresponding chords (which we call "harmonizing the scale"), we can finally talk about these roman numerals.
We use roman numerals to label the chords in any given key, and we often (but not
always) capitalize these numerals based on whether chord is major or minor. We write major
chords with capital letters, minor chords with lowercase letters, and indicate the
diminished chord with this symbol: °. The number is the "degree" of the chord -
which just means "which number note in the scale is this chord." The 1st note of the scale
(or the root) gets a 1, the second note gets a 2, and so on.
So given the information about the chords in the key above, we get the following roman numerals for the key of A major:
A major:  I
B minor:  ii
C# minor: iii
D major:  IV
E major:  V
F# minor: vi
G# diminished: vii°
Now, minor keys get a little more complicated, because there are two ways to "number" the chords. The first is basically exactly the same as above:
A minor:  i
B dim. :  ii°
C major:  III
D minor:  iv
E minor:  v
F major:  VI
G major:  VII
But what is much more common is to label the minor key chords as they relate to the major key with the same root note. That looks like this:
A minor:  i
B dim. :  ii°
C major:  bIII
D minor:  iv
E minor:  v
F major:  bVI
G major:  bVII
This looks largely the same, but notice that the three major chords are labelled as "bIII, bVI, and bVII". We would pronounce this as "flat major three, flat major six," and so on. So why would we label these chords this way? Because, again, we're labelling them relative to the major key. In A major, the third degree is C# minor. So the third degree in A minor, which is "C major", can be thought of as the "flat major" version of that C# minor chord.
This is actually a really smart way to notate these for various reasons, but it's an extra layer of complexity that I wouldn't probably use for a beginner.
Ok - now here's where I'm going to leave some information out to prevent this already big post from getting too dense. I'm not going to talk much about why certain chords in the key are major, minor, and diminished.
I'm planning to write another post and do another video where we'll talk about intervals and how to describe the scales and chords using them - and there are a lot of reasons that this is a better way to think about these concepts. But to keep things simple for now, I'm going to gloss over that. If you're interested in this topic, here's an exercise you might try out. Take all those diatonic chords I listed above, and count the semitones (half steps, or one fret) between each note. There is a pattern that you may notice!
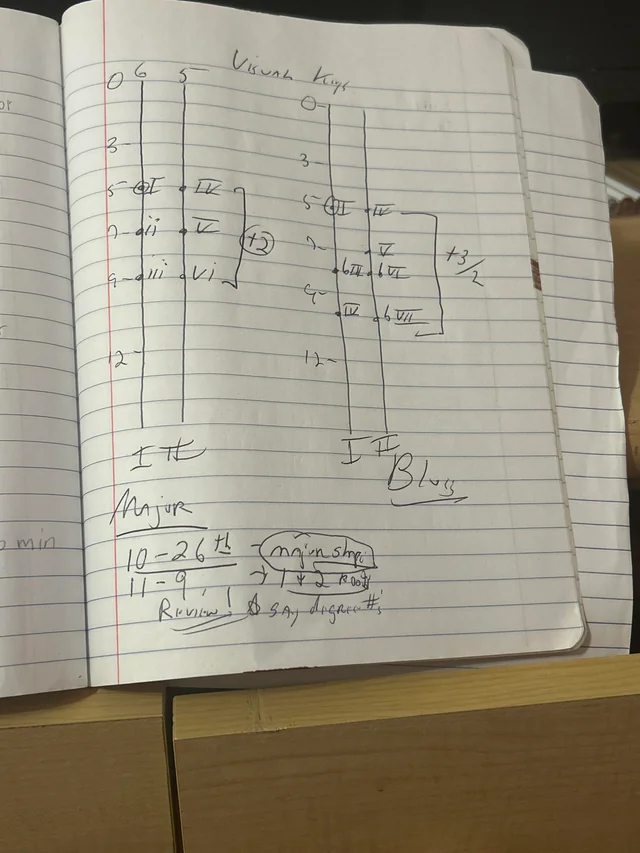
The Diagram
Alright. So now we understand how to build a scale. We understand how to figure out the chords that go along with the scale. We understand how to take a chord symbol written as a roman numeral, and how to interpret the roman numeral to determine the tonality of the chord (whether it's major, minor, or diminished). With all this information, we can finally decode this diagram.
/u/Upbeat_County6342 has done a really good job of redrawing the diagram, so I'll focus on trying to explain what's being shown:
The diagram is showing you a way of remembering and easily finding the 6 main chords in any given key, starting from a root note on the 6th string. The one on the left shows you a major key, and the one on the right shows you a minor key (why it's labelled "blues" I'm not sure) (UPDATE: see the final paragraph at the bottom of the post for a possible explanation).
(why 6 chords instead of 7? because we're ignoring the diminished chord, which is special, weird, and not often used).
This diagram shows the root on the 5th fret, but you can slide these shapes around and they work anywhere, which is one of the things that makes this a really useful thing to memorize.
The first thing to know is just the "shapes" for the major and minor scale. These two diagrams are tab for the first octave of the A major and then the A minor scale, starting at the 5th fret on the 6th string. I've labelled the notes being played below the tab. I am only including the bottom E, A, and D strings.
A major:

D --------------------------6-
A --------------5---7---9-----
E --5---7---9-----------------

    A   B   C#  D   E   F#  G#
Notice that the notes in this first diagram correspond to the positions marked with roman numerals in the major scale diagram.
A minor:

How your teacher labelled it:

D ------------------------------
A -------------------7---8---10-
E --5---7---8---10--------------

    A   B   C   D    E   F   G

How I would play it:
D ----------------------------
A --------------5---7---8---10
E --5---7---8-----------------
    A   B   C   D   E   F   G
AAlso notice that in the first bit of tab, the notes correspond to what your teacher labelled with roman numerals. I changed the fingering slightly in my second tab, which corresponds to my better minor scale diagram above. This is how I would play the scale for this purpose, but both are fine - they amount to the same information.
So now, with all the background I laid out above, we can label each of these shapes with the roman numerals for their diatonic chords, which is exactly what our diagram shows:
D --------------------------6-
A --------------5---7---9-----
E --5---7---9-----------------

    A   B   C#  D   E   F#  G#
    I   ii  iii IV  V   vi  vii°
    How your teacher labelled it:

D --------------------------------
A ---------------------7---8---10-
E --5---7----8----10--------------

    A   B    C    D    E   F   G

    i   ii*  bIII iv   v   bVI bVII

How I would play it:
D --------------------------------
A ----------------5----7---8---10-
E --5---7----9--------------------

    A   B    C    D    E   F   G

    i   ii°  bIII iv   v   bVI bVII
THE POINT OF ALL THIS TEXT:
So ultimately what this diagram is trying to show you is that if you know those two basic scale shapes, you can use that to figure out what the chords in any given key are. By combining the scale shape, and the knowledge of which degrees in the scale should have minor or major chords, you can move the shape to any root and instantly know all the chords for that key, in both minor and major keys.
This is extremely useful knowledge so it's very much worth taking the time to understand this, even though it seems really complicated.
If you're at a jam and someone says "it's a 1-4-5 in B major" you can use this to immediately know what chords to play. You can also use this to easily transpose a song to a different key - if you know the song has a "I V bVII IV" progression, you can map that into whatever key you like. (by the way, as an exercise, try out that I V bVII IV progression in a key of your choice, it's one of my favorites).
Also, here are a few points I didn't touch on, which may be of interest and worthy of further exploration. I'm planning to expand on these topics in some future posts, so if that sounds interesting, considering subscribing to my email list via Substack (it's free!):
Why certain degrees get major or minor or diminished chords.
Why writing roman numerals for minor keys relative to their major key is useful/smart/makes sense
How we can build 7th chords or even further extended chords using the same system.
How modes relate to all the stuff I laid out above.
Using intervals instead of steps to notate a scale, and why this is better - just a bit more complicated so I left it out for the purpose of trying to build quick understanding.
Any other questions you might have!
How to Use and Practice this Idea
So, one last thing - knowing all this, how can you practice like your teacher wants you to?
First, learn the two major / minor scale shapes I showed above. Play through them while saying the name of each note.
Once you've got that down, reference your diagram and play through the chords. Say the name of each chord out loud as you go. Start with the keys your instructor laid out (A major and A minor). Then, test your understanding by working out the chords for a different key, and try the same exercise there - work out the scale, work out the chords, then play through both.
You'll use these barre chord shapes. Move through the scale, and choose the appropriate shape for the string the root is on, and the correct tonality for the chords.


So, putting everything together, here is an example of how to use this idea to find the first 6 diatonic chords in the key A major.
Here's our first diagram again. We'll reference this to figure out whether to play a major or minor chord for each note in the scale. Remember - capitalized numbers get a major chord, and lowercase ones get a minor chord. We'll pretend the diminished chord isn't there.
We're doing this for the key of A major, so we'll place the first note of the shape on the A note at the 5th fret of the 6th string. This is the I chord of our key, and it's going to be the A major barre chord:

I Chord: A Major
We play up the scale to get the next note, which is B. This is the ii chord of our key, which means it will be minor:

ii Chord: B Minor
Now, we'll repeat the idea for the rest of the chords in the diagram, which gives us these chords:
iii Chord: C♯ Minor
IV Chord: D Major
V Chord: E Major
vi Chord: F♯ Minor
And that's it! Figuring out these diationic chords is the entire point of the diagram scrawled by your teacher! In my video on the topic, I work through several more examples of the idea, so if you'd like to see those examples diagrammed out and hear them played, go check out that video on my channel.
I want to stress again that this is extremely useful and valuable knowledge as you learn the instrument. It may seem really complex but I promise once you get these concepts down you will be really really happy to know them and they will pay major dividends throughout all your time with the instrument. It's actually not nearly as complex as it seems either, you just have to work through understanding it once and then it pays off forever.
This post got way longer than I expected, so don't hesitate to ask if there's any parts of it that don't make sense.
One minor edit: I think the reason your teacher labelled the left diagram as "blues" is because it's fairly common in blues to play the minor pentatonic scale over major chords, and to use the bIII, bVI, and bVII chords in place of their normal major counterpart. I assumed his capitalization of I, IV, and V was a mistake, but he may be suggesting a bluesy mixture of chords as opposed to a straight minor key. I'd argue that this is pretty confusing for a beginner who hasn't had time to figure out everything I wrote above, but it's also an interesting set of chords to play with - try it out as an exercise for all the above, and think of a "blues key" as containing these chords: I bIII IV V bVI bVII. (ignore the ii dim).
If you can figure out the 6 chords those numbers correspond to for a key of your choice, you'll know you've grokked everything in this novel of a post ;)
Alright, so there's where my original post on reddit ended. I have to say that I like this version with the diagrams a lot more. But for musical concepts, even with visuals, there's just no better way to make it clear than to actually hear the idea in practice. So, if you're interested in that, go check out my video demonstration over on YouTube.
I had a lot of fun putting all this together, even though it wound up being quite a lot of work - especially generating the diagrams and editing the video. I'm hoping to find time soon to do some more guitar / music lessons in this vein.
If you found this post valuable, please consider subscribing to either the Garage Grooves Youtube Channel, my Substack Page, or even just reaching out to me via email at [email protected]. I'm not in this for the money (to be clear, there is no money) - so almost all my motivation to put in this level of effort comes from knowing people are getting value out of it.
Acknowledgements
I'd like to thank all the Reddit users who responded positively to my post. It was really satisfying to see that something I wrote was helpful to so many people. I'd especially like to thank /u/MrmmphMrmmph, who encouraged me to take the time to create a video demonstrating the concepts in the post, and who also compared my playing in this video to Larry Carlton's - an enormous compliment which I can only aspire to someday deserve. Thanks man!
If you liked this post, sign up for my email list via Substack so you can be the first to know whenever I publish a new one!